iPad Installation Instructions
These instructions can be downloaded at the bottom of the article.
1. Update your iPad to the most recent version of iOS.
On the iPad home screen, select Settings.
Select Software Update. If an update is available, select Download and Install.
1a. 
1b
Once you have completed the update to the latest version of iOS, please proceed with step 2.
2. Change Display Settings (to not automatically turn off)
On the iPad home screen, select Settings. 
Go to Display & Brightness and change Auto-Lock to “Never”.

3. Install email on the iPad
You will need an email account installed on the iPad to send the inspection reports after completing an inspection. This email must be linked to FoodCode-Pro.
Loaner iPads from Relavent have an iCloud email already built in and connected to FoodCode-Pro.
If you have provided your own iPads, installing your work email on the iPad is required.
Under most circumstances, your internal IT department will need to do this for you as they have specific licensing and access requirements they must adhere to.
Having your work email on the iPad enables the inspector to have additional copies of the inspections automatically stored in their sent email folder.
4. Install Claris FileMakerGo 2024
Go to the App Store icon on your iPad.

a. Search for FileMaker Go 2024. Select the get/download button. Once the download is complete, select Open (same location).

b. FileMaker Go provides four sample templates (Contacts, Event Management, Invoices and Projects) that are preloaded. Delete all these files before installing FoodCode-Pro.
To delete the templates, select and hold each icon until the task bar appears. Select delete file when prompted again. When all the templates are removed, close the app.

5. Install FoodCode-Pro on iPad
a. From your email on the iPad (see Step #3 above), click the link in the email that looks something like:
http://relaventsync.360works.com/RelaventSync/dbDownload/server-side/FCP-YourTownMA/db2c1485-7cf8-4cbf-8596-afabc2293980
b. You will then be prompted to download FoodCode-Pro to the iPad. Select Download.
The download progress bar is the line under the download icon. The download has been completed when the progress bar goes away.

c. Once the download has been completed, touch the download arrow.

d. Now select the top choice, which will be your new FoodCpode-Pro file.

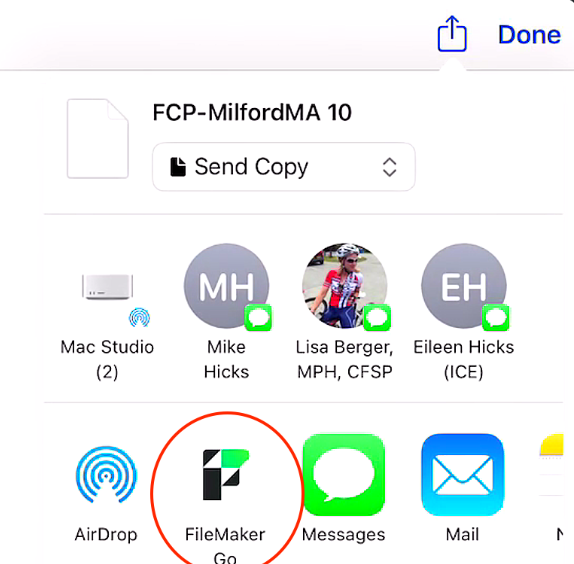
e. After selecting your file a new window appears, touch the share icon at the top right..

f. Select the FileMaker Go 2024 icon. You may have to scroll to the right to see this icon.
g. If You still can't find the Filemaker Go icon, select the More button and scroll down to find it.

h. You will then be prompted for your Account Name and Password. Then you will be prompted for your login credentials (I.e., Account Name, Account Password, Personal Password).
i. Once you have completely logged in to your account, run your first sync by selecting the Sync to Cloud button. Accept any updates if/when prompted.
j. Once the sync is complete, you are ready to conduct your first inspection.